These instructions are also available on the wiki. Last update : February 11th, 2021.
Requirements
Here's what you'll need on your system before you get started :
- PHP >= 7.3
As recommanded for Drupal 7, along with the following extensions :
mb_stringpgsqldomgdsimplexmlxmlzipcurlcan also be useful for development and testing purposes
- nginx.
- PostgreSQL 9.4.12 or later.
Preparation
You'll need to configure your reverse proxy to make Drupal available to the outside world.
Here's an example of a working nginx configuration:
server {
   listen 80;
   listen [::]:80;

   root /var/www/yakforms;
   index index.html;

   location ~ \.php$ {
   try_files $uri =404;
   include /etc/nginx/fastcgi_params;
   fastcgi_send_timeout 300s;
   fastcgi_read_timeout 300s;
   fastcgi_pass unix:/run/php/php7.3-fpm.sock;
   fastcgi_index index.php;
   fastcgi_param SCRIPT_FILENAME $document_root$fastcgi_script_name;
   }

   error_log /var/log/nginx/yakforms.error.log;
    access_log /var/log/nginx/yakforms.access.log combined;

   location / {
      autoindex on ;
      autoindex_exact_size off;
      try_files $uri index.html /index.php?$query_string;
   }
}
Note: you'll need to add your SSL configuration to this server block to complete a secure installation. You'll want to run nginx -t before restarting nginx to test your configuration.
All good ? Then we can go on to the actual installation!
Installation steps
- Download Yakforms.
Follow the instructions on this page. Place the extracted files where your web server can find it (for example,
var/www/yakformsif you used the NGINX template above). - Set up your database and
settings.phpfile. The instructions can be found on the Drupal website (steps 2 and 3). - Access the installation script.
Browse to your website at the following address:
youryakforms.ex/install.php. You'll be presented with an installation menu. Wait for everything to install and ...
- Fill in your website information.
There you'll need to set up your site name, email address, and administration account. This is account that you'll use to manage Yakforms, so be sure to memorize the login and password.
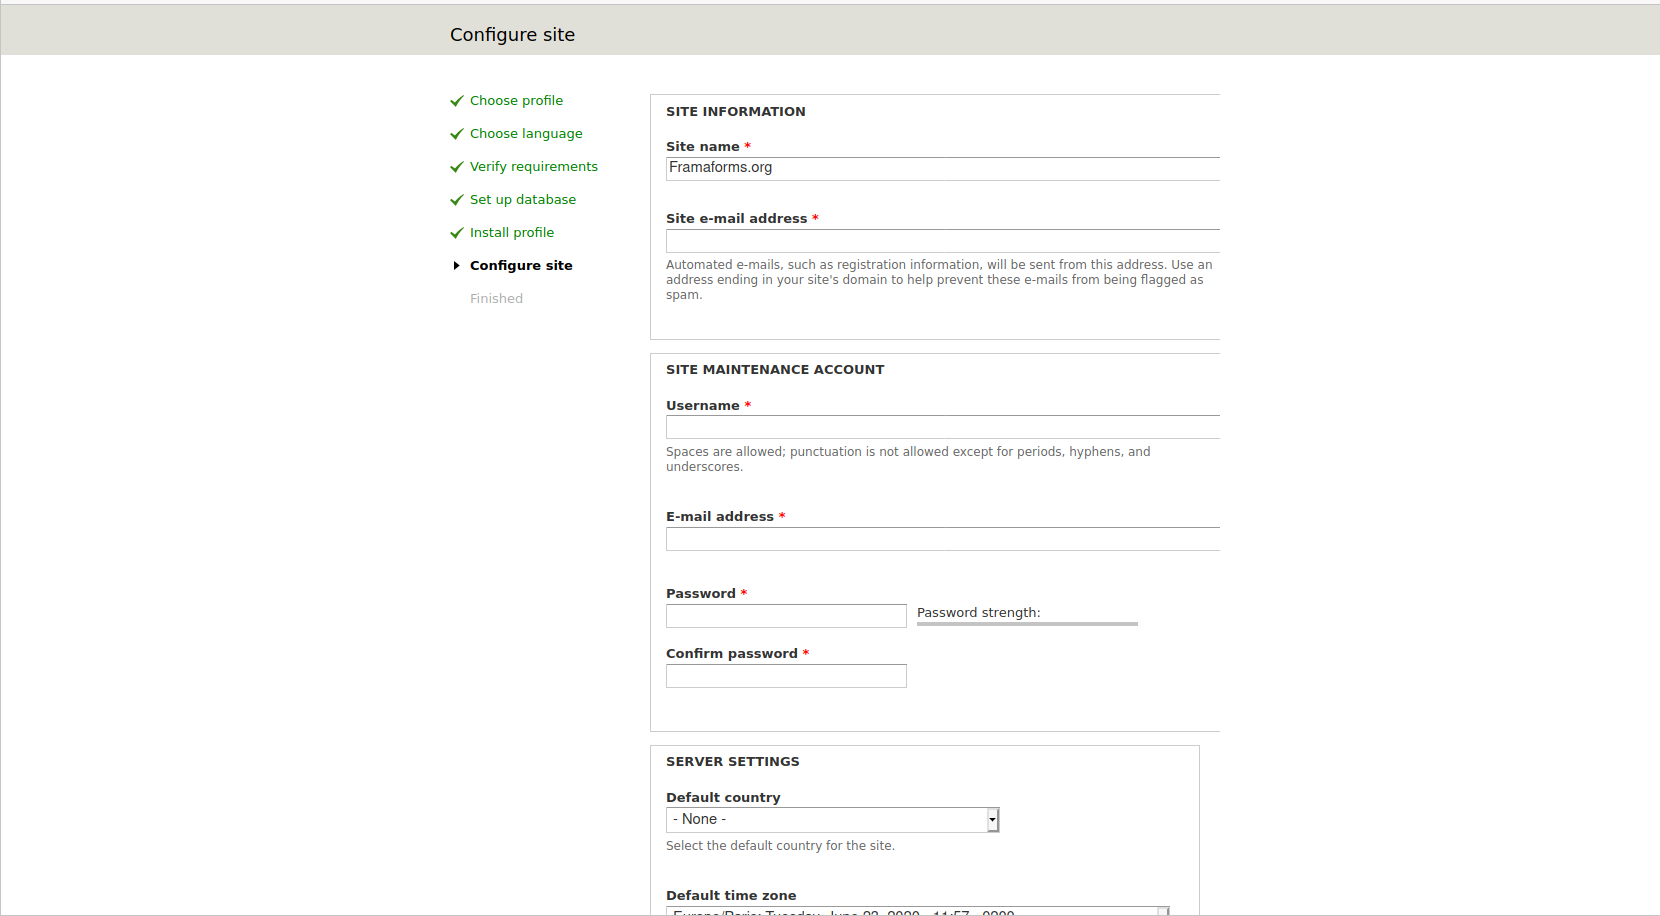
- Save, and visit your website. You're almost there! There's just two more things you'll need to do.
- Activate the feature2.
Click on "Modules" in the administration bar (or browse to
/admin/menu), look for the "yakforms_feature" line. Check the corresponding box, and save your configuration by clicking on the submit button at the bottom of the page.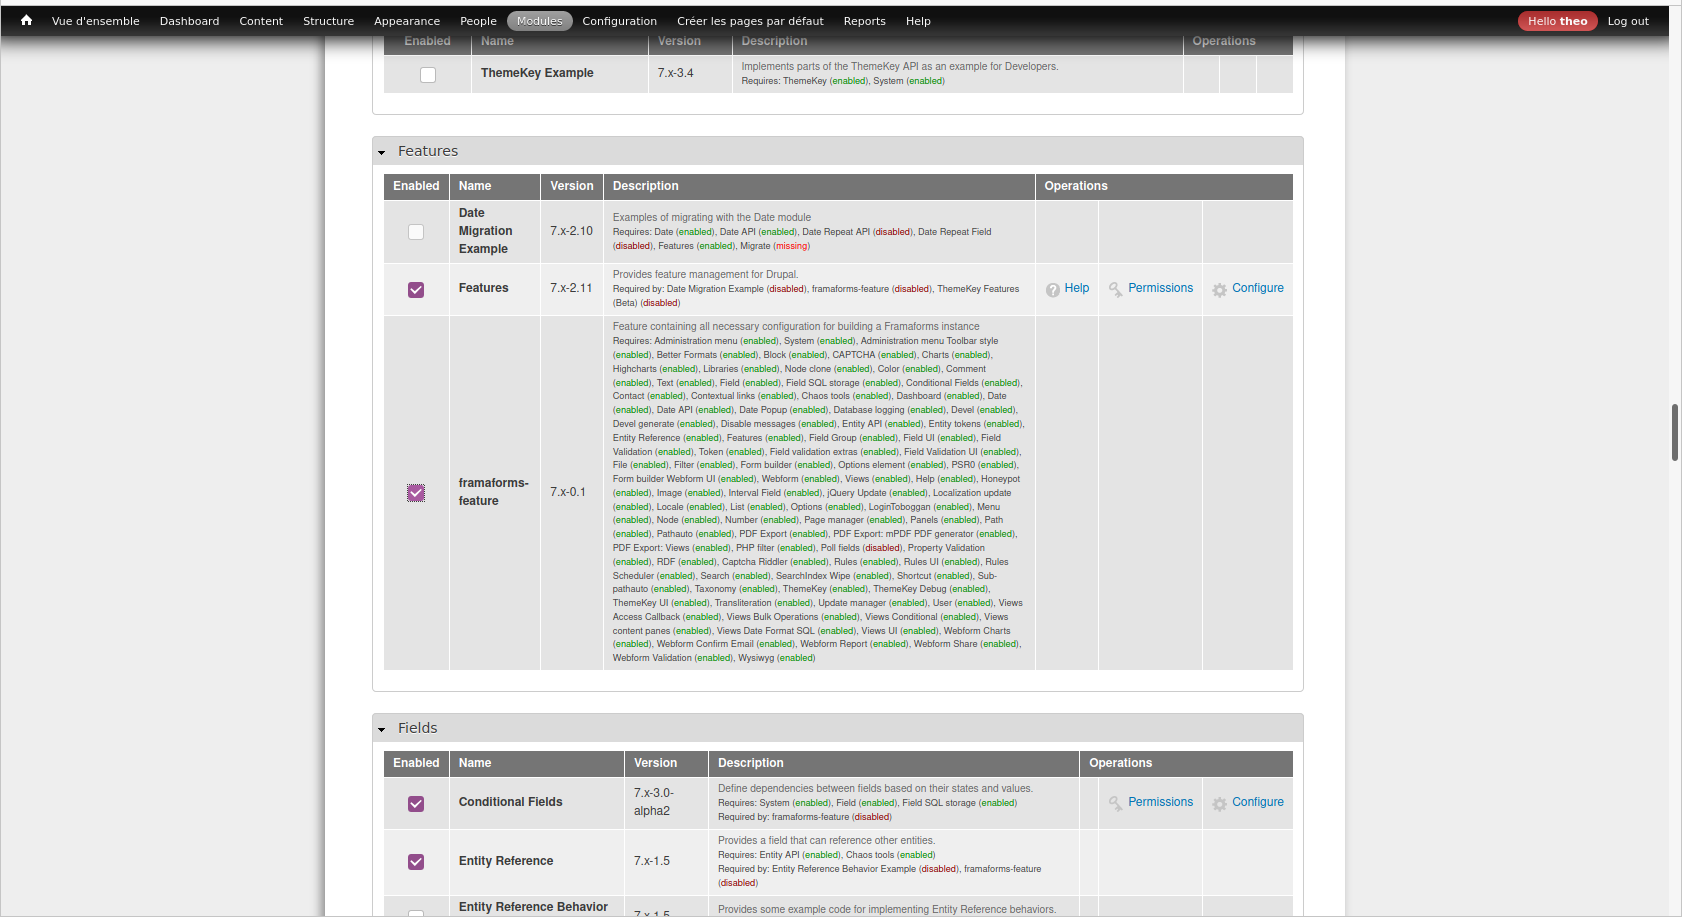 Activate the feature !
 - Activate the Yakforms module. On the "Modules" menu, activate the Yakforms module the same way you did the feature. This module must be activated after the feature, so don't skip any steps.
- Activate other helpful modules. Yakforms also comes with two helpful modules that bring some additional features : Yakforms Share Results and Yakforms Public Results. Activating these two modules is also recommended. More information here and here
- Create default pages (optional).
Yakforms comes with a ready-to-use frontpage, 404/403 error page, etc. To activate them, go to
youryakforms.ex/admin/config/system/yakformsand click on "Click default pages" at the bottom of the page.
And you should be good to go !
Further tweaking (optional)
Yakforms comes with a default configuration, that you can entirely change to your liking, by accessing all the Drupal core and modules configuration menus.
Some things that you might want to changes can include :
- Hide site errors.
Site errors, warnings and messages are visible to all users, but you might want to hide them. For that, you'll need to browse to
/admin/people/permissions, and disable the corresponding lines for authenticated and/or anonymous users (" View status messages", "View warning messages", "View error messages"). - Change the private file system path.
For now, private user files are stored inside the root folder. That is not good practice : for security reasons, you should separate files that are accessible to everyone (pictures for the homepage and documentation, etc) to user-specific files that should be kept secret (such as a form's export .csv files). In order to do that, you'll need to browse to create the private folder outside of the web directory, then browse to
/admin/config/media/file-systemand fill in the folder system path. If you get errors, make sure your folder's owner is you HTTP server user, and that the folder is writable. - Change the language of your website. Note that for now providing a translation file during the installation process causes it to crash. This issue hasn't been fixed yet. That means that your website will be installed in English by default. But you can change the language after having installed Drupal following these instructions.
-
An installation profile basically allows you to install various modules and themes on your Drupal installation, and make sure you have all the feature you need for a specific purpose. It has an installation script that is run on Drupal installation, dependencies, etc. In our case, the
yakforms_orgprofile packages the necessary Drupal modules (most notablywebformandform_builderbut not only!), themes (theframatheme was created specifically for this website), and assets such as static images. ↩ -
Basically, Drupal stores all its configuration in the database, which is not ideal for the installation process.
featuresis a Drupal module that transforms this configuration into code. A feature then behaves like a module. Yakforms has a singlefeature, namedYakforms_feature, that provides the necessary configuration for a lot of modules (for example : someviewsare defined in this feature, user permissions are set, etc). ↩